I Like Big Bundts and I Cannot Lie: Cranberry Orange Bundt Cake

You other brothers can’t deny, That when a girl walks in with an itty bitty waist, And a round thing in your face . . . oh, sorry, it had to be done. Apologies to Sir Mix-a-Lot. But he does. And I do. In fact, I’m so in love with this particular bundt cake that I’ve made it three times since Christmas. And the spellchecker keeps changing bundt to burnt. So if I say burnt cake at some point, know I mean bundt. No one likes a burnt cake.

This is the perfect cake to go with an afternoon cup of tea or coffee, or a light midnight snack! It makes a generous sized bundt so you can take half to a friend, neighbor, or hairdresser.

Cranberry Orange Bundt Cake

Serves 18. Calories 249, Fat, 8.7g

Recipe adapted from Cooking Light

  • 13 1/2 ounces all-purpose flour (about 3 cups) plus several tablespoons for flouring the pan
  • 2 teaspoons baking powder
  • 1 teaspoon baking soda
  • 1/2 teaspoon salt
  • 1 3/4 cups granulated sugar
  • 12 tablespoons butter, softened + extra for greasing the pan
  • 3 large eggs
  • 1 teaspoon vanilla extract
  • 3/4 cup low-fat buttermilk
  • 1 cup sweetened, dried cranberries
  • 1/2 cup fresh orange juice
  • 2 cups powdered sugar
  • 1/4 cup fresh orange juice
  • 1 tablespoon butter, melted
  • 2 teaspoons grated orange rind

Gather the ingredients

Combine 1c sweetened , dried cranberries and 1/2 c fresh squeezed orange juice in a microwave safe dish. Microwave for 1 minute, let stand for 10.

Microwave the orange juice and dried cranberries

Preheat the oven to 350 degrees. Grease a large bundt pan with softened butter. Heavily. Generously. Thickly. Make sure to get into every crack and crevice. When you think you have enough butter on there, put on a little more. Generosity in this step will ensure an easy release later. I use cheap paint brushes for tasks like these then pop them in the dishwasher. Don’t have a brush? Use a knob of butter and a paper towel. After you’ve buttered, dump a tablespoon or two of flour in the pan and shake it around. Coat every buttered surface. Do this over the sink and you can tap out the excess. See? Looks like snow.

Generously grease your bundt panDon't miss a spot!

Weigh your flour or lightly spoon it into measuring cups. Whisk together flour, baking powder, baking soda, and salt in a bowl.

Weigh your flour

In a bowl, mix granulated sugar, and 12 tablespoons of butter on medium speed until well blended. Add eggs, one at a time, beating after each addition.

Mix the sugar and butter on medium speedAdd the eggs one at a time

Beat in vanilla. Add flour mixture and buttermilk alternately to the butter mixture, beginning and ending with flour.

Beat in the vanillaMix in flour mixture alternately with buttermilkAlternately with buttermilk

Fold the cranberry mixture into the batter. Notice that I’ve given up the mixer for a soft spatula. Folding is simply using the motion of a J (Go ahead, draw a J in the air in front of you, get the idea?) to carefully incorporate the ingredients.

Fold cranberry mixture into the batter

Pour the batter into the prepared pan and smooth out the top. Bake at 350 degrees for about 45 minutes, but start checking for doneness at 30 minutes. It’s also nice if you can rotate your pan halfway through cooking. Most ovens have hot spots and this will keep your cake cooking evenly.

Pour the batter into the prepared panSmooth the top

Once the cake is done, cool on a wire rack for five minutes, then turn the rack over onto the top of the bundt pan and flip to release cake onto rack and continue to cool. Do not pull a Mr. Bundt and pick the pan up and beat it against the rack. This will not get you a pretty cake. I am not making this up.

Now for the best part! Glaze!

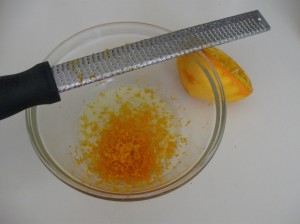
Zest your orange. I use the same orange that I used for juice. No reason to waste any. Do not zest your fingers. Trust me. It will not add to the flavor. Also, don’t zest into the white part of the peel called the pith. It’s bitter and also won’t add to the flavor.

Zest your orange

Combine the powdered sugar, 1/4c fresh orange juice, 1T melted butter, and orange rind. Stir until smooth. Glaze will be loose.

Add the juiceAdd powdered sugarMix until smooth

Now, here’s what I think. And since I’ve made this cake three times I’m an expert so listen up. This glaze is GOOOOOOD. You could just pour it over the warm cake, let it run off, and eat. But that seems to be a waste to me. You can see from the photos that I put a sheet of Cut-rite in the bottom of a sheet pan, sat the rack with the cake on top, and poured on my glaze. This catches the excess glaze but it also keep you from sticking your tongue in there and lapping up the glaze like a crazy person. Not that I’d know anything about that. Then, as the glaze ran off and cooled, I scooped it up with my spatula and poured it over again and again until I had coated the entire cake and used up almost all the glaze. Much messier and a little more time-consuming, but SO worth it.

Icing the cake

Either way, it’s a beautiful, light cake.

Beautiful bundt!

Any foods you’re addicted to lately? What’s your favorite snack cake? Is there a food that helps you get through winter?

Honey Butter Wheat Rolls

We’ve had some nasty weather here the last three days. The kind that makes you want to stay in your jammies and never leave the house. Perfect weather to warm up the kitchen and fill the house with the aroma of fresh baked bread. And I have the perfect recipe to get you started!

These rolls are sooooo good. So good. And so easy. I’ve made them twice in the last three weeks and people keep asking for more! The recipe comes from Cook’s Country from America’s Test Kitchen. Regular readers know that I love America’s Test Kitchen! You can catch episodes of the show on PBS on the weekend or find them on the web. The rolls don’t require a lot of work, but there is time for rising. Start in the morning and have them in time for lunch!

Honey Butter Wheat Rolls

  • 1 3/4 cups whole milk, heated to 110 degrees, plus 1 tablespoon
  • 6 tablespoons plus 1 teaspoon honey
  • 5 tablespoons unsalted butter, melted and cooled
  • 1 large egg
  • 2 1/2 cups (13 3/4 ounces) whole wheat flour
  • 1 3/4 cups (8 3/4 ounces) all-purpose flour
  • 1 tablespoon instant or rapid-rise yeast *
  • 2 1/4 teaspoons salt
*This is more than one packet of yeast contains. Buy multiple packets or a jar of yeast.


Heat the oven to 200 degrees with the rack in the lower-middle position. When the oven temperature reads 200 degrees, turn the oven off and leave the door closed.

Grease a large bowl and a 13×9 baking dish.

Get all your ingredients together before beginning. Melt and cool the butter. Warm the milk. Measure the flours. I like to use a scale to measure the flour. Since I’ve started doing this I feel that my baked recipes are turning out better. Plus, if you’re working on weight control, it’s a great way to ensure accurate potion sizes. Weigh a few of those grocery store chicken breasts. You’ll be shocked at how many portions they turn out to be!

Wheat flourWhite flour

Combine 1 3/4 c milk, 6T honey, 4T melted butter, and the egg in a large liquid measuring cup. Coating the tablespoon with cooking spray before measuring the honey will allow the honey to slide out without sticking!

Mix the butter, honey, milk, and egg

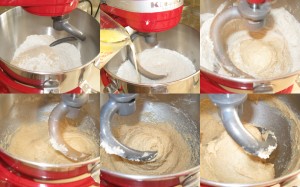
Put the dough hook on your stand mixer  and mix the whole wheat flour, white flour, yeast, and salt on low speed until combined. Slowly pour in the milk mixture and mix until dough comes together, about 1 minute. Stop the mixer and check to make sure there is no unmixed flour at the bottom of the bowl. Increase the speed of the mixer to medium and mix until the dough is smooth and almost clears the sides of the bowl, but still sticks to the bottom. This should take about 6-8 minutes. You can see the evolution of the dough below.

Evolution of dough

Transfer the dough to your greased bowl and cover with plastic wrap. Place the bowl in your turned-off oven. Dough should double in size after about 45 minutes.

Let the dough rise

On a lightly floured surface, punch down the dough. Divide into quarters and cut each piece into quarters. You should have 16 dough balls. Form the rolls by pulling the edges under until the top is round and smooth. You can use the counter to form each ball into a smooth, tight round by cupping the dough with your hand and rolling it. Arrange the rolls in your prepared pan and cover loosely with the plastic wrap. Place the pan back in the oven and let the rolls rest until doubled in size, about 20 minutes.

Remove the rolls from the oven and uncover. Heat oven to 400 degrees. Brush rolls with remaining 1T of milk. Bake rolls until golden brown, about 20 minutes. Rotate the dish halfway through baking. Combine the remaining 1T melted butter and 1T honey in a bowl. Brush tools with honey butter and let cool in the pan for 10 minutes on a wire rack. Serve!

Perfectly done rolls!

You can serve them with regular butter or with honey butter for a special touch. Store in a plastic container for up to a week. I reheat them for about 10 seconds in the microwave before serving.

I love the smell of baking bread in the house. What’s your favorite thing to cook on a rainy or snowy winter day?